Best Disk Lock Tutorials
Best Disk Lock Introduction
Best Disk Lock is a powerful tool that can completely hide disk partitions on your computer, and disable USB storage devices or set them as read-only. The completely hidden partition cannot be found in any environment by anyone else, so the security and confidentiality of your data on this partition can be ensured.
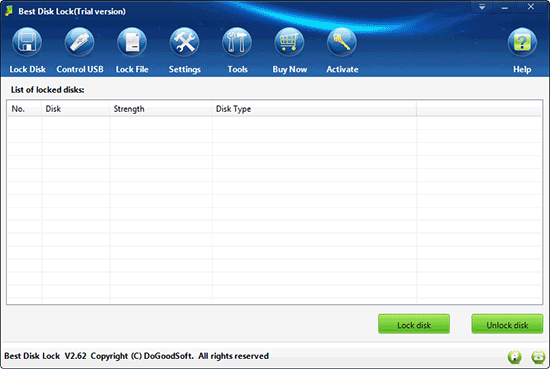
Figure 1
Basic Information of Best Disk Lock
Software Name: Best Disk Lock
Latest Version: 2.63
Last Updated: March 28, 2016
Size: 3.91MB
OS: WinXP/Vista/Win7/Win8/Win10
Category: System Security Software
Overview page: http://www.dogoodsoft.com/best-disk-lock/
Download page: http://www.dogoodsoft.com/best-disk-lock/free-download.html
Downlod and Install Best Disk Lock
Download
You can download Best Disk Lock by clicking "Free Download" at the download page.
Install
Double click the downloaded Best Disk Lock setup program(bdlsetup.exe), and follow the step-by-step setup wizard to finish the installation. You can choose the installation directory to your personal preference.
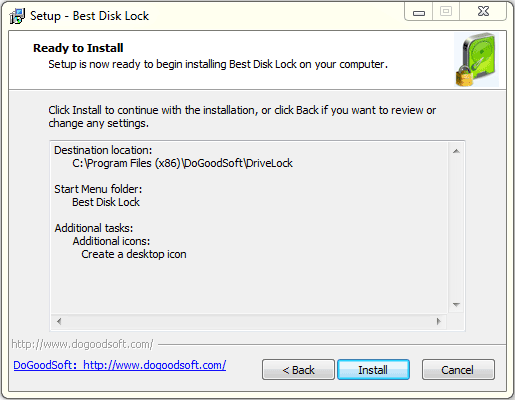
Figure 2
Then you can lock a disk, disable USB storage devices or set USB storage devices using Best Disk Lock.
Lock Disk
To hide a local disk with three different levels, among which the advanced-lock can completely hide disk partitions on your computer.
Start Best Disk Lock, click the "Lock disk" button on the bottom right corner of the window, select the drive you want to lock and the lock level in the pop-up window, and then click OK.
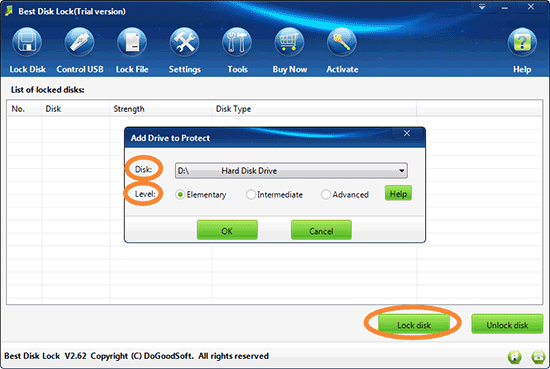
Figure 3
If you want to unlock a drive, please start Best Disk Lock, select the disk record you want to unlock from the "List of locked disks", and click the "Unlock disk" button on the bottom right corner of the window.
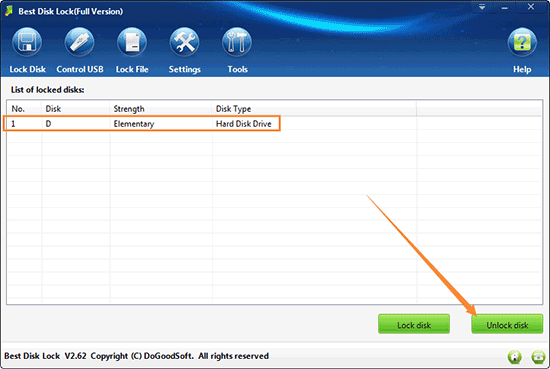
Figure 4
The difference between the three levels of disk lock:
Elementary-lock: The locked disk cannot be seen in My Computer or Windows Explorer, but you can access to it with command line (cmd mode).
Intermediate-lock: The locked disk cannot be seen in My Computer, Windows Explorer or command line; but it can be accessed after reinstalling system or replacing the computer. Usually we recommend you use the intermediate lock.
Advanced-lock: The locked disk cannot be seen accessed in any environment, even reinstall system or replace computer. Advanced lock enjoy the highest disk lock level which can completely hide disks on your computer. However, the lock will be in effect after you restart your computer.
Control USB
The USB drive and external hard drive does not work when you connect the device to the computer. Or files in these devices are able to be accessed but not modified, also cannot write data into the devices.
Start Best Disk Lock, click Control USB, tick "Disable USB storage devices" or "Set USB storage devices as read-only" accoring to your own needs.
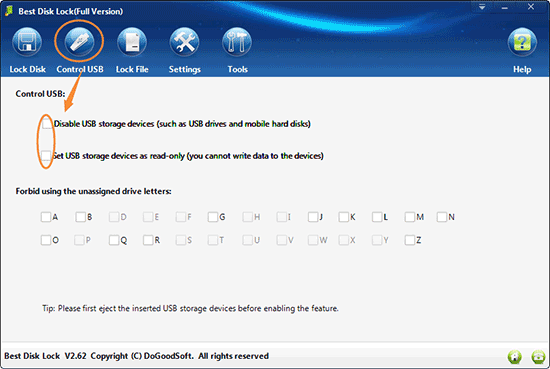
Figure 5
Disable USB storage devices:
The USB storage device such as USB flash drive and external hard drive does not work when you connect the device to the computer. With this method you can protect your data stored on the computer from leakage.
Set USB storage devices as read-only:
Files stored in the USB flash drives or external hard drives are able to be accessed but not modified, also you cannot wirte data into the devices.This kind of protection protects your data without influencing the normal use of USB devices.
If you do not need this, just untick the option "Disable USB storage devices" or "Set USB storage devices as read-only".
Forbid using the unassigned drive letters
This feature is an accessibility to disable USB storage devices by forbidding the use of these unassigned drive letters.
Start Best Disk Lock, click Control USB, and tick the checkbox in front of the drive letters.
Lock File
To be used to set NTFS-formatted partitions, files and folders not accessible. When you want to open a locked file, folder or partition, an error displayed "You don't currently have permission to access this folder".
Start Best Disk Lock, click Lock File, select the file, folder or disk partition you want to lock by clicking Browse, then click Lock.
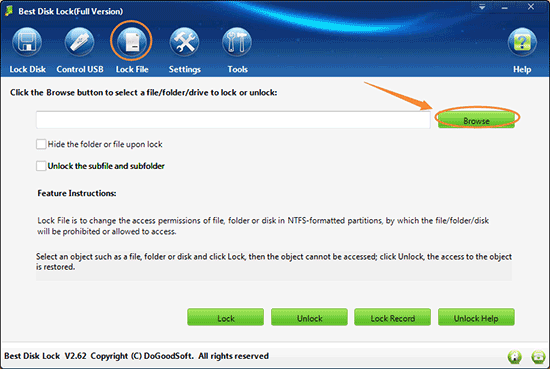
Figure 6
Unlock: start Best Disk Lock, click Lock File, click Browse button to select the file, folder or disk partition you want to unlock, then click Unlock.
You can view the lock and unlock records in detail by clicking Lock Record button.
Settings
Best Disk Lock Settings includes two modules: system security settings and system optimization settings.
System Security Settings
7 system security settings: Prohibit the use of Registry, Prohibit the use of Task Manager, Disable right click on My Computer, Prohibit the use of Control Panel, Clean documents when exiting the system, Disable autorun of CD, Prohibit the use of Programs and Features.
System Optimization Settings
5 system optimization options: Boost programs'running speed, Remove the small arrow on shortcuts, Clean unused DLLs in the memory automatically, Automatically close programs that have stopped responding, Shorten the latency time to close a non-responding.
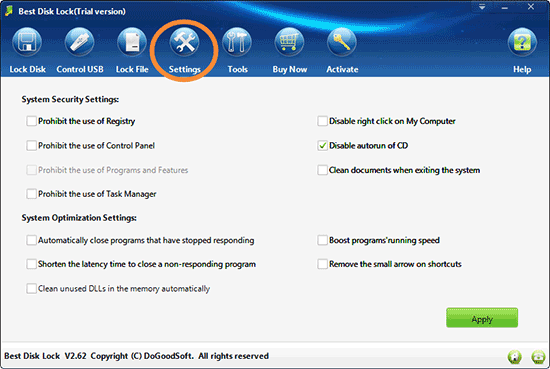
Figure 7
Start Best Disk Lock, click the Settings button, and select the system setting(s) you want to apply.
Tools
The feature Tools in Best Disk Lock includes 18 windows system tools.
18 system tools: Registry, System Information, System Configuration Utility, Dr.Watson, Disk Management Utility, Device Manager, Disk Defragmenter, System Configuration Editor, Task Manager, System Component Services, Backup and Restore, Certmgr, Computer Management, Local Security Policy, Services, CMD, Local Group Policy, Disk Cleanup.
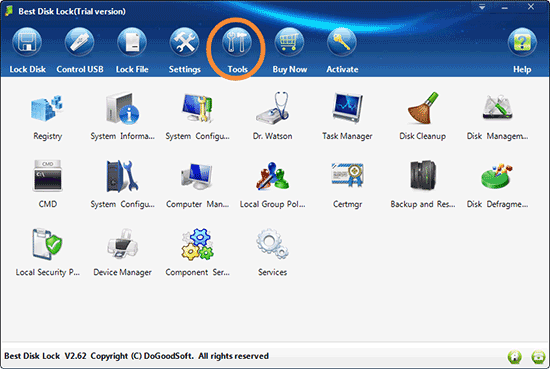
Figure 8
Start Best Disk Lock, click the Tools button, and click the system tool(s) you want to open.
How to change the default admin password
When you open a trial version Best Disk Lock, you can only type the default password 888888 to enter into. After you registerted as a full version user, you can change the password.
Start Best Disk Lock, click the first button (from left to right) in the upper right corner of the window, and select "Modify Password" from the dropdown menu. In the Modify Password window, enter 888888 into the original password input box (if you changed it, please enter your password), and then set a new password.
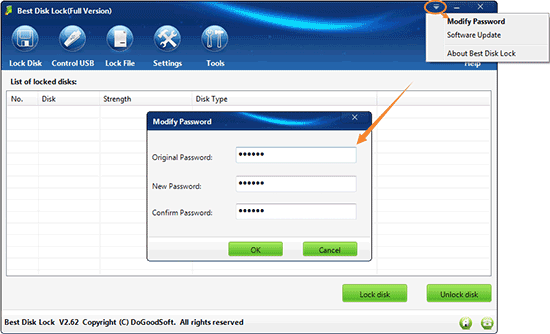
Figure 9